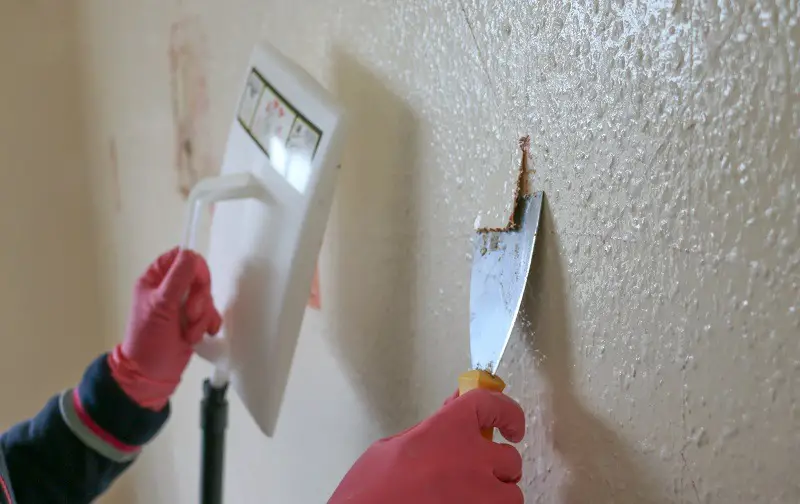
Chipwood wallpaper can be a stubborn and challenging material to remove. Whether you’re redecorating or simply tired of the outdated look, knowing how to remove woodchip wallpaper properly is essential.
Gathering the Right Tools
Before diving into the removal process, it’s crucial to gather the necessary tools and materials. Here are the items you’ll need:
- Drop cloths or plastic sheeting to protect the floor and furniture.
- Stepladder for reaching higher areas.
- Wallpaper scorer or scoring tool to create perforations.
- Wallpaper stripping solution or mixture of warm water and dish soap.
- Spray bottle or sponge for applying the stripping solution.
- Wide putty knife or scraper for removing the wallpaper.
- Bucket or container for holding the stripping solution.
- Sandpaper for smoothing the walls after removal.
- Protective gloves and safety goggles for your safety.
Preparing the Room
Proper preparation ensures a smoother and more efficient wallpaper removal process. Follow these steps:
- Clear the room: Remove furniture, wall decorations, and any other obstacles that might hinder your access to the walls.
- Protect surfaces: Cover the floor with drop cloths or plastic sheeting to catch any debris or stripping solution drips.
- Turn off electricity: Ensure safety by switching off power to any outlets or switches on the wall you’ll be working on.
how to remove chipwood wallpaper? Step-by-Step Guide

Now that you’ve prepared the room and gathered the necessary tools, let’s dive into the step-by-step process of removing chipwood wallpaper:
Step 1: Test an inconspicuous area
Before starting the removal process, it’s important to determine the type of wallpaper and the ease of removal.
Choose a small, inconspicuous area and attempt to peel off a corner or edge of the wallpaper. If it comes off easily, you’re in luck. If not, you’ll need to proceed with the more involved removal techniques outlined below.
Step 2: Score the wallpaper
Use a wallpaper scorer or scoring tool to create small perforations all over the wallpaper. This allows the stripping solution to penetrate and loosen the adhesive.
Step 3: Prepare the stripping solution
If you’re using a store-bought wallpaper stripping solution, follow the manufacturer’s instructions for mixing it with water.
Alternatively, you can create a DIY solution by combining warm water with a few drops of dish soap.
Step 4: Apply the stripping solution
Fill a spray bottle or sponge with the stripping solution and evenly apply it to the wallpaper.
Be sure to saturate the surface without causing excessive drips or running.
Step 5: Let the solution soak
Allow the stripping solution to soak into the wallpaper for the recommended time, usually around 10-15 minutes. This allows it to penetrate and weaken the adhesive.
Step 6: Start removing the wallpaper
Using a wide putty knife or scraper, gently lift the edges or corners of the wallpaper. Gradually work your way across the wall, applying more stripping solution as needed.
Be careful not to gouge or damage the wall beneath.
Step 7: Repeat the process
If the wallpaper is not coming off easily, repeat steps 4 to 6, allowing the stripping solution additional time to work on stubborn areas. Patience and persistence are key.
Step 8: Clean the walls
Once all the wallpaper has been removed, clean the walls with warm water and a mild detergent to remove any residue or adhesive.
Step 9: Smooth and prepare the walls
After the walls have dried, use sandpaper to smooth any imperfections or remnants of the wallpaper. This creates a clean surface for painting or applying new wallpaper.
Step 10: Finish with primer and paint
If you’re planning to paint the walls, apply a suitable primer to ensure an even finish. Follow up with your chosen paint colour to complete the transformation.
Alternative Methods for Removing Chipwood Wallpaper
While the above step-by-step guide is the most common and effective method for removing chipwood wallpaper, there are alternative approaches you can try:
-
Using a steamer
Steamers can be an effective tool for removing stubborn chipwood wallpaper. Simply hold the steamer against the wallpaper, allowing the heat and moisture to loosen the adhesive.
Then follow the steps outlined in the main removal guide.
-
Dry stripping
In some cases, you may find that the chipwood wallpaper is old and brittle. In such instances, you can attempt to dry strip the wallpaper by carefully peeling it off without the use of any stripping solution. This method requires caution to avoid wall damage.
-
Chemical wallpaper removers
There are various chemical wallpaper removers available on the market. Follow the instructions provided by the manufacturer for the best results.
It’s important to note that each method may have different levels of effectiveness depending on the specific type and condition of the chipwood wallpaper.
Dealing with Stubborn Residue
Sometimes, even after removing the wallpaper, you may be left with stubborn residue on the walls. Here’s how to tackle it:
-
Remove residue with stripping solution
Apply a small amount of the wallpaper stripping solution directly to the residue and gently scrub with a sponge or cloth. The solution should help dissolve the remaining adhesive.
-
Use a wallpaper steamer
If the residue persists, you can try using a steamer to soften it further, making it easier to scrape off.
-
Sand the walls
If all else fails, sanding the walls lightly can help remove any stubborn residue. Be cautious not to damage the wall surface.
Remember to thoroughly clean the walls after removing the residue to ensure a smooth and clean surface.
Tips for Efficiency and Safety
To make the wallpaper removal process smoother and safer, keep these tips in mind:
-
Work in sections
Divide the room into manageable sections and tackle one area at a time. This prevents the stripping solution from drying out before you can remove the wallpaper.
-
Protect yourself
Wear protective gloves and safety goggles to shield your hands and eyes from any chemicals or debris.
-
Open windows or use ventilation
Proper ventilation is crucial when working with stripping solutions or steaming wallpaper. Open windows or use fans to ensure good airflow and minimize the inhalation of fumes.
-
Be patient and gentle
Wallpaper removal can be time-consuming and may require some finesse. Avoid rushing the process and be gentle to prevent damage to the walls.
-
Test for lead
If your home was built before the 1980s, there is a possibility that the layers of wallpaper may contain lead. It’s advisable to test for lead before proceeding with the removal process. Consult a professional if necessary.
FAQs
FAQ 1: Can I paint over chipwood wallpaper?
Yes, you can paint over chipwood wallpaper. However, it’s important to note that the texture of the wallpaper may still show through the paint, even after priming. If you prefer a smoother finish, removing the wallpaper is recommended.
FAQ 2: How long does it take to remove chipwood wallpaper?
The time required to remove chipwood wallpaper depends on several factors, including the size of the room, the condition of the wallpaper, and your experience.
On average, it can take anywhere from a few hours to a full day to remove chipwood wallpaper from a single room.
FAQ 3: Can I use a steamer to remove chipwood wallpaper?
Yes, using a steamer can be an effective method for removing chipwood wallpaper. The steam helps to loosen the adhesive, making it easier to scrape off the wallpaper.
However, it’s essential to follow the manufacturer’s instructions and take proper safety precautions when using a steamer.
FAQ 4: Is it necessary to remove the wallpaper backing?
Removing the wallpaper backing is not always necessary. If the backing is well adhered to the wall and there are no visible signs of damage or peeling, you can leave it in place.
However, if the backing is loose or damaged, it’s recommended to remove it for a smoother surface.
FAQ 5: Should I hire a professional for wallpaper removal?
While wallpaper removal can be a DIY project, hiring a professional can ensure a faster and more efficient process, especially for larger areas or complex wallpaper types.
Professionals have the experience and tools to handle the job effectively, saving you time and potential frustration.
FAQ 6: How do I repair any wall damage after removing the wallpaper?
After removing the wallpaper, inspect the walls for any damage, such as small holes or gouges.
Fill these imperfections with spackling compound or filler, then sand the area smooth. Finally, prime and paint the repaired spots to match the surrounding wall.


Comments are closed.