Automatic tapers are essential tools for achieving seamless drywall plasterboard joints with minimal effort. They streamline the taping process by applying joint compound and paper tape simultaneously, significantly reducing the time and labour involved. This innovation helps both professionals and DIY enthusiasts achieve a professional finish with precision.
With various models available, such as the range of automatic tapers at drywalltoolsdirect.co.uk, you can utilise a range of mechanical taping equipment depending on a project needs, providing versatility and efficiency for your business. By automating the taping process, these tools not only enhance productivity but also contribute to a more polished aesthetic in interior spaces. The right automatic taper can make all the difference in transforming a time-consuming task into a quick and straightforward procedure.
Understanding the functionality and benefits of automatic tapers is crucial for anyone looking to improve their drywall installation skills. This article explores the features, advantages, and tips for using automatic tapers effectively, making it a valuable resource for both beginners and experienced users alike.
Fundamentals of Automatic Tapers
Automatic tapers are essential tools in the drywall finishing process. They significantly improve the efficiency and consistency of applying joint tape and compound, making them a preferred choice for professionals.
Design and Functionality
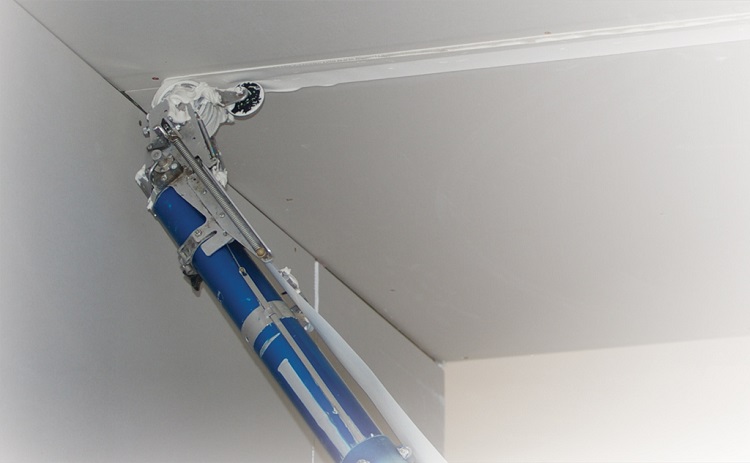
Automatic tapers feature a compact, lightweight design that allows for easy operation. They consist of a tape compartment, a mud compartment, and a tapered nozzle that combines the tape and mud application simultaneously.
The mechanism relies on a series of geared rollers that pull the tape from the spool while applying joint compound evenly. This dual-action process reduces the manual effort required and provides a more uniform layer of compound across the taper’s width.
Many models also come with adjustable settings for the amount of mud applied, giving users control over the thickness of the joint. The streamlined design ensures minimal waste and enhances productivity on the job site.
Types and Variations
There are several types of automatic tapers available, catering to different project needs. The most common include:
- Manual operated tapers: Require physical effort to pull the tape and apply mud.
- Electric tapers: Use powered mechanisms for faster and more consistent operation.
Variations may include features such as quick-release tape mechanisms or ergonomic grips for better handling.
Professionals may choose a specific type based on factors like the scale of the job and personal preference. Understanding the differences can aid in selecting the most suitable taper for individual projects.
Operation and Techniques
This section focuses on the essential steps required to operate automatic tapers effectively. It outlines the critical setup and preparation, the specific operating procedures, and the necessary maintenance and cleaning to ensure longevity and optimal performance.
Setup and Preparation
Before operation, proper setup is crucial for achieving smooth and consistent joint finishes. First, ensure that the taper is placed on a sturdy surface. Adjust the angle of the taper’s front for the specific joint type being used.
Next, load the joint compound correctly into the taper’s mud compartment. The consistency of the compound should be smooth to prevent clogging.
Finally, confirm that the taper’s blades are sharp and in good condition to ensure clean-cut joints. Attention to detail in the initial setup can significantly affect the outcome of the finishing process.
Operating Procedures
When operating the automatic taper, hold it at a consistent angle against the drywall surface. Start from one end of the joint and apply firm, even pressure while moving along the seam. A steady, controlled motion ensures an even application of joint compound.
Periodically check the amount of compound being applied to maintain adequacy without excess. In situations that require a second pass, allow the initial coat to dry before reapplying.
It’s important to monitor the taper’s settings, adjusting as needed to suit varying joint conditions. Correct operation leads to a smoother finish and reduces the need for additional sanding later.
Maintenance and Cleaning
Regular maintenance and cleaning are vital for lasting functionality of automatic tapers. After each use, thoroughly clean the mud compartment to prevent residue buildup.
Disassemble the taper as required for a more in-depth cleaning of the blades and other components. Use warm, soapy water and a soft brush to remove dried compound.
Regularly inspect the blades for wear and replace them as necessary to maintain effectiveness. Proper care extends the life of the tool and ensures that it operates at peak performance during subsequent projects.
In summary, without doubt, utilising mechanical taping equipment will not only save your building or drywall business time and money – it will also help you to provide your customers with cleaner and professionally finished joints on your drywall plasterboard projects.