This page contains affiliate links, meaning we may earn a small commission if you make a purchase through these links. Learn More
Are you tired of dealing with lingering cooking odors and excess moisture in your kitchen? If so, it might be time to invest in the best cooker hood for your kitchen.
Cooker hoods, also known as range hoods or kitchen exhaust fans, are essential appliances that help maintain a clean and comfortable cooking environment.
Factors to Consider When Choosing a Cooker Hood
Kitchen Size and Layout
Before selecting a cooker hood, consider the size and layout of your kitchen. The hood’s capacity should match the volume of air in your kitchen to ensure effective ventilation.
Types of Cooker Hoods
There are various types of cooker hoods to choose from, including wall-mounted, island, and under-cabinet models. Each type has its advantages, so it’s essential to pick one that suits your kitchen’s design.
Extraction Rate
The extraction rate, measured in cubic meters per hour (m³/h), determines how quickly the cooker hood can clear the air. Calculate the extraction rate you need based on your kitchen’s size.
Noise Level
Nobody wants a noisy kitchen. Look for cooker hoods with a low noise level rating to maintain a peaceful cooking environment.
Design and Style
Your cooker hood should complement your kitchen’s aesthetics. Choose a design and finish that blends seamlessly with your decor.
Filters
Cooker hoods come with different types of filters, such as grease filters and charcoal filters. These filters play a crucial role in purifying the air. Make sure they are easy to clean or replace.
Lighting
Good lighting is essential for cooking. Many cooker hoods come with built-in lights that illuminate your cooking area.
The best 90cm cooker hood
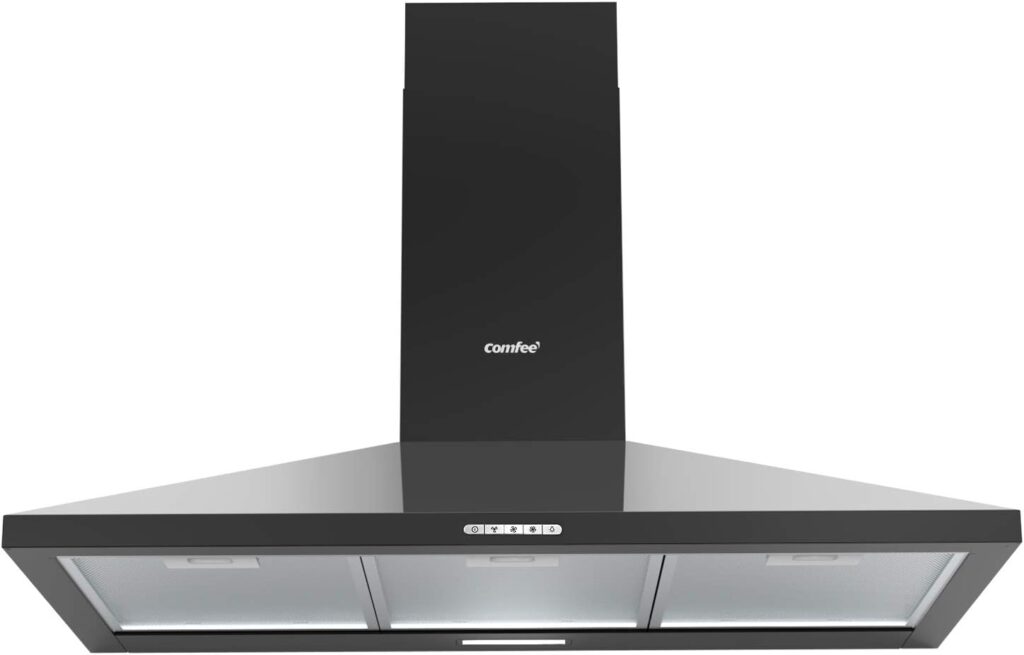
1. COMFEE’ 90 cm Chimney Cooker Hood

The COMFEE’ Cooker Hood, available in sleek silver and black, boasts stainless steel construction with a brushed finish.
This extractor fan packs a punch with its strong 320 m3/h airflow, swiftly banishing cooking odors, steam, and grease, ensuring a fresh kitchen atmosphere.
With dual extraction modes (duct out and internal recirculation) and three adjustable speeds, it adapts to your cooking needs seamlessly.
Its user-friendly interface and durable buttons, designed for 20,000 cycles, make operation intuitive. Plus, it comes with an LED light for clear stove-top visibility.
Key Features
- Powerful 320 m3/h suction.
- Dual extraction modes.
- Three adjustable speeds.
- Durable button controls.
- LED light for visibility.
- Easy installation with instructional video.
2. Russell Hobbs 90cm Cooker Hood

The Russell Hobbs RHSCH901SS Cooker Hood offers ultimate convenience for your kitchen.
Its 3-speed settings provide precise control over odors and steam. This stainless steel hood, measuring 50cm in depth, 90cm in width, and 96cm in height, features a brushed finish.
You have the choice between extraction and recirculation for ventilation, and it includes 2 long-lasting, energy-efficient LED lights for clear visibility during cooking.
Key Features
- 3-Speed Precision
- Stainless Steel Elegance
- Dual Ventilation Options
- Energy-Efficient LED Lighting
- Ample Dimensions for Coverage
- Easy Odor and Steam Control
3. CIARRA 90cm Black Cooker Hood

The CIARRA Chimney Cooker Kitchen Extractor, with its A rating energy class, offers exceptional energy efficiency, saving up to 40% compared to Class C models.
Its extra-large 90cm width and three 26cm grease filters make it perfect for large hobs in medium-sized kitchens.
With a powerful 370m³/h suction capacity and three-speed levels, it effectively refreshes your kitchen during cooking.
The matte black surface is not only easy to clean but also adds an elegant touch to your kitchen, with a subtle shine under the light.
Key Features
- Exceptional A rating energy efficiency
- Large 90cm extraction area
- Powerful 370m³/h suction
- Sleek matte black design
- Easy-to-maintain surface
- Three-speed versatility.
How often should I clean the filters in my cooker hood?
You should clean or replace the filters in your cooker hood every three to six months for optimal performance.
This regular maintenance helps ensure that the cooker hood effectively captures grease, cooking odors, and other pollutants, keeping your kitchen environment clean and fresh.
Can I use a cooker hood without external ventilation?
Yes, you can use a cooker hood without external ventilation. Cooker hoods come in two main types: ducted and recirculating.
While ducted hoods expel the filtered air outside, recirculating hoods purify the air through filters and then release it back into the kitchen.
Recirculating hoods are a suitable option if external ventilation is not available in your kitchen, but keep in mind that ducted hoods are generally more effective at removing cooking fumes and odors.
Do cooker hoods consume a lot of energy?
No, cooker hoods typically do not consume a lot of energy. Modern cooker hoods are designed to be energy-efficient, and their power consumption is relatively low.
Therefore, using a cooker hood in your kitchen is unlikely to result in a significant increase in your energy bills.
DIY Installation of a Cooker Hood
While some may opt for professional installation, a DIY installation is entirely feasible if you have the necessary skills and tools. Here’s a step-by-step guide to walk you through the process:
Step 1: Gather Your Tools and Materials
Before you begin, ensure you have all the necessary tools and materials at hand. You’ll typically need:
- Screwdriver
- Drill
- Measuring tape
- Pencil
- Spirit level
- Wall plugs and screws
- Ducting kit (if required)
- Cooker hood mounting kit
Step 2: Turn Off the Power
Safety is paramount. Begin by turning off the power supply to the area where you’ll be working. This prevents any electrical accidents during the installation process.
Step 3: Measure and Mark
Determine the ideal placement for your cooker hood. It should be directly above your cooking appliance for maximum efficiency. Use a measuring tape, pencil, and spirit level to mark the precise spot on the wall where the hood will be mounted.
Step 4: Drill Holes
With your markings in place, use a drill to create holes for the wall plugs. Make sure the holes are appropriately sized for the plugs you’ll be using.
Step 5: Attach Wall Plugs
Insert wall plugs into the holes you’ve drilled. These will provide a secure anchor for the screws that hold the cooker hood in place.
Step 6: Mount the Hood
Next, carefully mount the cooker hood onto the wall, aligning it with the holes and wall plugs. Secure the hood in place using the provided screws.
Step 7: Connect Electrical Wiring
If your cooker hood requires electrical wiring, follow the manufacturer’s instructions for connecting it to the power source. This step should be done by a qualified electrician if you’re not confident in your electrical skills.
Step 8: Attach Ducting (If Necessary)
If your cooker hood requires external ventilation, connect the ducting kit to the hood and ensure it leads to an appropriate external vent. Ducting is essential for expelling cooking fumes outside.
Step 9: Test the Hood
After installation, turn on the power and test the cooker hood to ensure it’s functioning correctly. Check for any unusual noises or issues with the fan and lights.
Step 10: Final Adjustments
Make any necessary adjustments to the positioning of the cooker hood to ensure it’s level and properly aligned. Tighten screws and ensure all components are securely in place.