This page contains affiliate links, meaning we may earn a small commission if you make a purchase through these links. Learn More
Wood carving requires finesse and accuracy, making it crucial to invest in a high-quality cordless rotary tool. The right tool can enhance your carving experience, providing the precision needed for intricate designs. Let’s carve our way through the intricacies of selecting the best rotary tool for wood carving.
Key Features to Look for in a Cordless Rotary Tool
-
Power and Performance: Ensure the tool has ample power and variable speed settings for diverse tasks.
-
Battery Life: Check for sufficient battery capacity and consider interchangeable batteries.
-
Battery Type: Prefer lithium-ion batteries for longevity and consistent power.
-
Ergonomics and Comfort: Choose a tool with a comfortable grip and ergonomic design.
-
Versatility: Look for a rotary tool with a variety of attachments for diverse applications.
-
Size and Weight: Consider the size and weight, especially for detailed work.
-
Safety Features: Check for a lock-off switch and adjustable safety guards.
Best Cordless Rotary Tools for Wood Carving and Other Applications
1. Dremel Lite 7760 best rotary tool
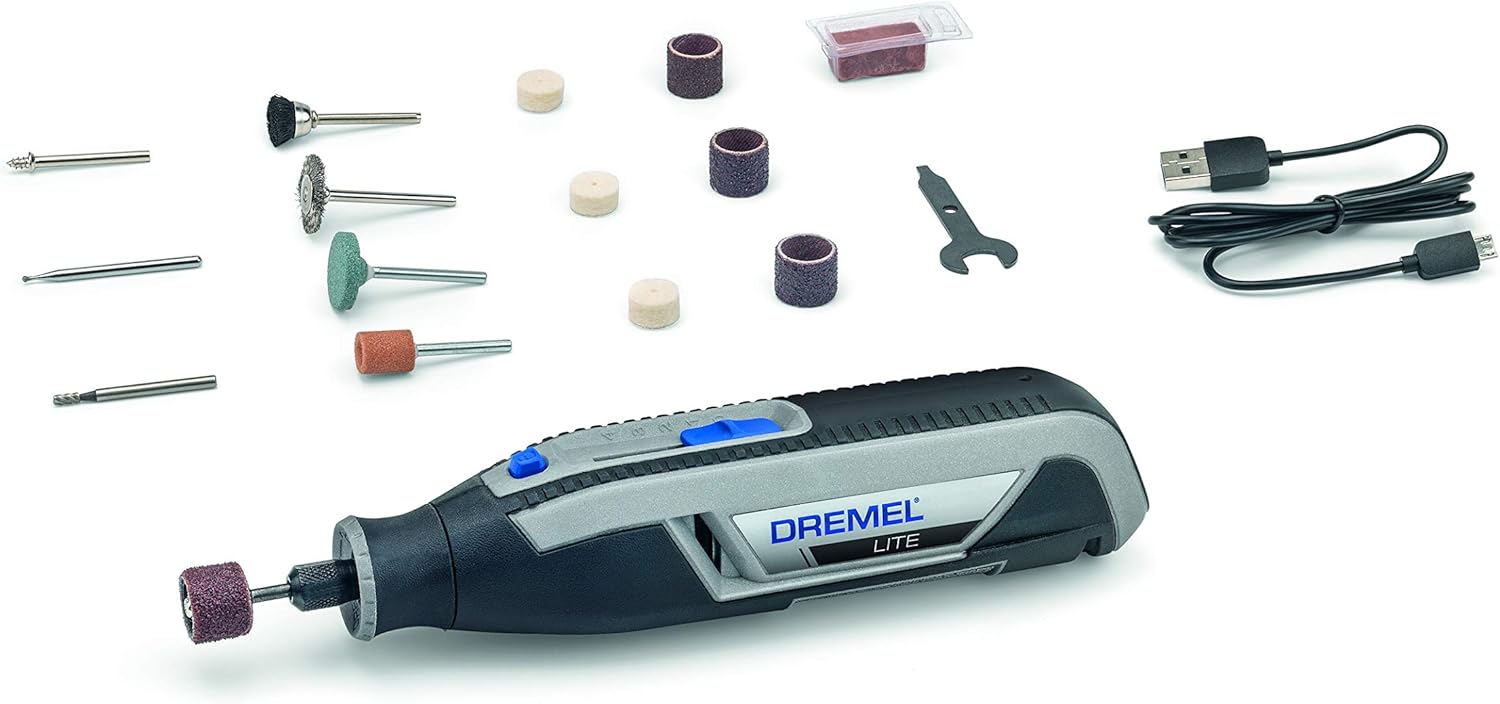
Key Advantages
- Cordless convenience with 3.6V Li-Ion battery.
- Variable speed (8,000 – 25,000 RPM) versatility.
- Multi-material functionality (glass, wood, metal, etc.).
- Lightweight and ergonomic design for user comfort.
- Quick accessory changes with EZ-Twist Nose Cap.
- Rechargeable for use anywhere, anytime.
- Quick start guide for easy initiation.
2. DEPSTECH Cordless Rotary Tool for wood carving

Key Advantages
-
Great for carving various materials: glass, wood, metal.
- Powerful 8V motor, 5 speeds (5,000-30,000 RPM).
- Type-C fast charging, cordless convenience.
- 2,000mAh lithium-ion battery, multiple uses per charge.
- Overload protection enhances safety during operation.
- Self-locking function prevents accessory accidents.
- Portable, lightweight design (22cm, 370g).
- Ergonomic non-slip grip for comfortable control.
- Low noise operation, ideal for precision tasks.
3. Dremel 8220 Cordless Rotary Tool

Key Advantages
- Multipurpuses applications: grinding, cutting, carving, engraving, sanding.
- 12V Lithium-Ion battery for powerful performance.
- Variable speed dial: 5,000-35,000 RPM flexibility.
- Soft grip minimises vibration for better control.
- EZ-Twist Nose Cap for quick accessory changes.
- 360-degree front LED light ensures visibility.
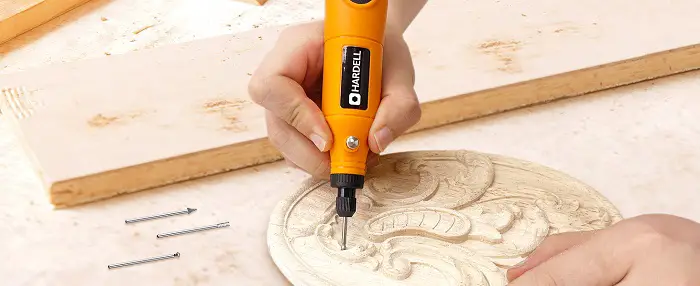
4. HARDELL Mini Cordless Rotary Tool

Key Advantages
- 5-Speed Precision for Varied Applications.
- Ideal for Carving on wood, glass, steel, plastic, etc.
- Compact, Lightweight Design for Enhanced Control.
- Quick USB Charging for Efficient Use.
- 200 Minutes Continuous Operation for Extended Work.
- LED Indicator for Improved Visibility in Workspaces.
- Rechargeable Battery for Cordless Convenience.
- Blind Spot Lighting LED for Better Illumination.
are Rotary Tools worth the money?
Investing in rotary tools is unquestionably worthwhile. Here’s why
multipurpose
Rotary tools offer a wide range of applications, from cutting and grinding to polishing and engraving, providing versatility for various tasks.
Precision and Detail
These tools excel at intricate and detailed work, allowing for precise craftsmanship in woodworking, metalworking, and other applications.
Efficiency and Time-Saving
Rotary tools are efficient, enabling users to complete tasks quickly and effectively. This time-saving aspect is valuable for both DIY projects and professional work.
Portability
Cordless rotary tools provide the convenience of portability, allowing users to work without being tethered to a power source. This is particularly beneficial for on-the-go or off-site projects.
Cost-Effective
Considering their versatility and durability, rotary tools offer good value for money. They can replace or supplement multiple single-purpose tools, potentially saving costs in the long run.
How to Properly Use a Cordless Rotary Tool for Wood Carving
Using a cordless rotary tool for wood carving requires attention to detail and safety. Here’s a guide on how to properly use one:
Choose the Right Bit
Select the appropriate carving bit for your specific wood carving project. Different bits are designed for various cutting and shaping tasks.
Wear Safety Gear
Prioritize safety by wearing protective gear, including safety glasses or goggles to shield your eyes from debris, and ear protection if the tool produces significant noise.
Secure the Workpiece
Secure the wood firmly using clamps or a vice to prevent movement while carving. This ensures stability and enhances safety during the carving process.
Test on Scrap Wood
Before starting on your actual project, practice on a scrap piece of wood to familiarise yourself with the rotary tool and the chosen carving bit. This helps refine your technique.
Adjust Speed Settings
Most cordless rotary tools have variable speed settings. Adjust the speed according to the type of wood and the task at hand. Lower speeds are suitable for delicate carving, while higher speeds work well for shaping and grinding.
Start Slowly
Begin carving at a slow speed to maintain control and precision. As you become more comfortable, you can gradually increase the speed for efficient material removal.
Use a Stencil or Template
To achieve precise designs, consider using a stencil or template on the wood surface. This helps guide your carving and ensures uniformity.
Hold the Tool Properly
Hold the cordless rotary tool with a firm grip, positioning your hands away from the cutting area. Maintain a stable stance to enhance control and minimise the risk of accidents.
Work in Well-Lit Area
Carve in a well-lit workspace to enhance visibility and accuracy. Good lighting helps you see the details of your work and minimises the chances of mistakes.
Frequent Breaks
Take regular breaks to prevent fatigue, especially during extended carving sessions. Fatigue can affect concentration and precision.
Finish with Sanding
Once the carving is complete, use sanding attachments on the rotary tool to refine the surface and achieve a smooth finish.
How to Change Rotary Tool Bit?
Changing the bit on a rotary tool is a simple process. Here’s a step-by-step guide on how to do it:
-
Switch Off and Unplug
- Ensure the rotary tool is switched off and, if it’s corded, unplugged from the power source. For cordless models, make sure the battery is removed or disconnected.
-
Select the Correct Collet Size
- Rotary tools typically come with collets of different sizes to accommodate various bit shank diameters. Choose the collet that matches the diameter of the new bit.
-
Loosen the Collet Nut
- Use the provided wrench to loosen the collet nut. The collet nut is usually located near the front of the rotary tool, securing the current bit in place. Rotate the nut counterclockwise to loosen it.
-
Remove the Current Bit
- Once the collet nut is loose, carefully remove the current bit from the collet. Some rotary tools may have a collet lock button that needs to be pressed to release the bit.
-
Insert the New Bit
- Align the new bit with the collet and insert it into the tool’s chuck. Ensure the bit is fully seated in the collet.
-
Tighten the Collet Nut
- Use the wrench to tighten the collet nut securely. Rotate it clockwise until it is snug. Make sure the bit is held firmly in place.
-
Check for Stability
- Once the new bit is installed, give it a gentle tug to check its stability. If it feels secure, you’re ready to use the rotary tool.
-
Power On and Test
- Switch on the rotary tool and briefly test the new bit at a low speed to ensure it is properly installed and functioning as expected.